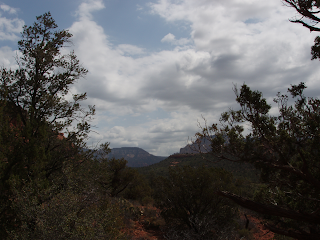
This photo is a good example of the issue and will illustrate the technique:

(click on the photo to see a larger version)
The sky is bright enough, and the clouds have nice detail. But the land and trees are dark and obscured. If you look closely you can see that there are details there, but you can't really make them out.
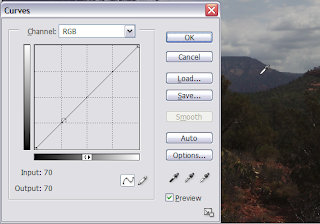
Let's see how the Curves tool can help. First, open up the Curves dialog box: Image -> Adjustments -> Curves. You will see there is a straight diagonal line. This is the curve we will be adjusting.
Start by placing the cursor over a part of the picture you want to adjust. Choose a midrange area within the part to be adjusted -- that is, neither the darkest nor the lightest part in the shadows, but somewhere in between. Notice that the cursor looks like an eyedropper. Click the mouse on the part you want to select, and hold the mouse button down to see where this level lands on the curve:

We can see that it is well into the bottom half of the curve. That shows us what part of the curve we will need to adjust.
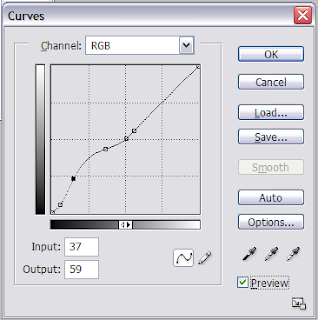
Now we're ready to adjust the curve. First, "pin" the upper part of the curve by making two holding points, at the midpoint and right above the middpoint. Just click the mouse at these two spots. Next, put a holder point down near the bottom of the curve. Now make another point in between the holders, but this time hold the mouse button down and drag the curve upwards to lighten this part of the picture. In this case, I used two points for this, to have finer control. If the Preview box is checked, you can see how your adjustment affects the picture as you are making it.

Once you are happy with the adjustment, click OK. Now admire your handiwork. As you can see, details in the foreground are suddenly much more visible:
There was no need to make any tedious selections. All we had to do was find the area of the curve to adjust; that allowed us to make the darker parts of the photo lighter, while leaving the other parts alone.
Happy Photoshopping!


wow, looks good. real good!
ReplyDeleteGreat Job, I did not know this.
ReplyDeleteThanks for your participation in the Cerebral Barbedwire "All articles and topics daily blog carnival" - http://cerebralbarbedwire.blogspot.com/2009/03/cerebral-barbedwire-blog-carnival-march_10.html
Feel free to particpate again